[Deprecated] Node.js学习记录 常用模块

在上一篇文章中,我们初步搭建了一个Node.js Web网页。在本文会着重介绍上一篇文章没有提到的常用的Api以及框架。

Node.js fs 模块

fs是filesystem的缩写,顾名思义,fs模块就是负责读写本地文件的。

1
2
3
4
5
6
7
8
9
10
readFile(path, charset, callback(err, text)) //异步读取文件
readFileSync(path, charset) //同步读取文件
writeFile(path, text, callback(error)) //异步写入文件
writeFileSync(path, text) //同步写入文件
stat(path, callback(err, stats)) //得到文件状态
statSync(fd)
mkdir(path, 权限, callback(error)) //异步创建目录
mkdirSync(path, 权限)
readdir(path, callback(err, files)) //异步读取目录
readdirSync(path)

这些函数基本上都是十分简单的,有趣的是基本每个函数都有同步和异步两个版本。以下给出示例:

1
2
3
4
5
6
7
8
9
10
11
12
13
14
15
16
17
18
19
20
21
22
23
24
25
26
27
28
29
const fs = require('fs');

//读取文件
fs.readFile('./Hello.js', 'utf-8', (err, text)=> {
console.log(text)
});
//同步写法
var text = fs.readFileSync('./Hello.js', 'utf-8');
console.log(text);

//写入文件
fs.writeFile("./temp.txt", "Something text");
fs.writeFileSync("./temp.txt", "Something text");

//文件状态
fs.stat("./temp.txt", (err, stats)=> {
console.log(stats.isFile()); //是否是文件
console.log(stats.isDirectory()); //是否是目录
});
//同步写法
var stats = fs.statSync("./temp.txt");
...

//列出本目录下所有文件名
fs.readdir("./", (err, files)=> {
for (var f of files) {
console.log(f);
}
});

这里我列举了一些常用的,实际上还有fs.exists,fs.appendFile等一堆方法,具体请参考
Node.js官方文档

顺便我这里为了写得方便,用了ES6的箭头函数、for..of循环,不了解ES6的话请去看一下
箭头函数
for…of循环

Koa 框架 中间件

还记得我们上一篇文章那个奇怪的语法吗?现在我们终于要了解这个啦。

1
2
3
app.use(function *() {
this.body = '<h1>Hello World</h1>';
});

实际上这那个函数是一个Koa的中间件。这里是一个简化的写法,写完整应该是这样。

1
2
3
4
5
app.use(function *(next) {
// do something
yield next;
// do something
});

这里最奇怪的东西就是,中间那个yield next是啥?

Gogo继续举例子。

1
2
3
4
5
6
7
8
9
10
11
12
13
14
15
16
17
const Koa = require('koa');

var app = new Koa();

app.use(function *(next) {
console.log("1")
yield next;
console.log("2")
});

app.use(function *(next) {
console.log("3")
yield next;
console.log("4")
});

app.listen(3000);

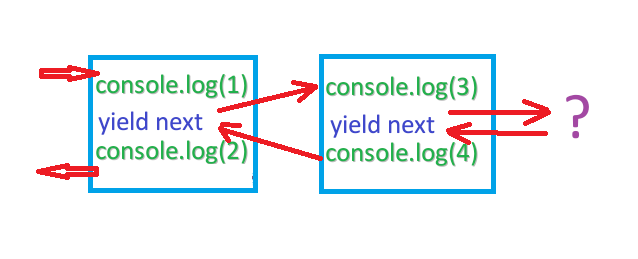
当我们输入 localhost:3000 后,我们会在控制台上看到依次输出了1 3 4 2

为什么会是这个顺序?再仔细看一遍代码,或许你能猜到 yield next 的作用了。
yield next 表示去执行下一个中间件。

当第一个中间件输出 1 以后,遇到yield next 于是开始执行第二个中间件 输出 3。

因为没有第三个中间件了,所以第二个中间件继续执行输出 4。

第二个中间件执行完毕,再回到第一个中间件执行输出 2。

画张图来演示大概是这样。

Koa 中间件

这种写法的好处显而易见,整个程序处理是一条链式结构,所以添加或移除一个功能都十分容易。

例如,有几个页面我们希望用户登录以后才能显示。要添加这个功能,只需要在这几个页面前添加一个中间件,判断登录以后才会yield next 显示页面。如果某天不需要这个需求了,只需要移除中间件即可。

当然这不是中间件被设计出来的唯一的用处,事实上yield 能返回的不仅仅只有 next,它能返回任何一个thunk函数,真正作用实际上是把异步操作简化同步操作的写法,解决回调金字塔。这属于比较高深的内容,Gogo刚开始看到也是大脑短路两眼瞎掉。如果感兴趣的话可以阅读这两篇文章
《koa实战》
koa源码分析系列 co的实现

Koa 路由

在浏览网页的过程中,我们经常会注意到地址栏的变化,比如 example.com/a 是一个网页,example.com/b 是另一个网页。那么用Koa怎么实现不同地址对应不同网页的功能呢?

我们可以用Koa的path 来实现

1
2
3
4
5
6
7
8
9
10
11
12
13
14
app.use(function*(next) {
if (this.path === '/') {
this.body = 'home!';
} else {
yield next;
}
});
app.use(function*(next) {
if (this.path === '/hello') {
this.body = 'hello!';
} else {
yield next;
}
});

在浏览器地址栏中输入 localhost:3000,你会看到 home!
输入localhost:3000/hello则会看到 hello!

这里实际上就用到了我们刚刚提到的中间件的用法,判断一个网址是否符合,符合就输出那个中间件的内容。

但是这种写法也是会造成麻烦,难道我们每写一个页面,都需要把那么长一段代码复制一遍吗?再说中间件过多可能也会造成效率问题。

这时我们可以通过一个koa-router的模块来解决这个问题。
添加如下代码,并安装koa-router模块。

1
const router = require('koa-router')();

这里要注意的是require(‘koa-router’)返回的是一个函数,我们直接调用这个函数得到router对象。

把路由的代码改成这样:

1
2
3
4
5
6
7
8
9
10
11
12
13
const router = require('koa-router')();

router.get('/', function*(next) {
this.body = 'home!';
yield next;
});

router.get('/hello', function*(next) {
this.body = 'hello!';
yield next;
});

app.use(router.routes());

貌似比前面那个版本简单不少,仔细想想还是不对劲啊,有很多个界面的话我是不是还是得抄好几遍?

行,我们继续简化。

我们先在项目根目录建一个 controllers 文件夹,在 controllers 中建一个 hello.js,内容如下。

1
2
3
4
5
6
7
8
9
10
11
12
13
14
15
16
17
"use strict";

function* home(next) {
this.body = "home!";
yield next;
}
function* hello(next) {
this.body = "hello!";
yield next;
}

module.exports = {
get: [
{url: "/", fun: home},
{url: "/hello", fun: hello},
],
};

把App.js中的路由改成这样:

1
2
3
4
5
6
7
8
9
10
11
12
13
14
15
16
const router = require('koa-router')();
const fs = require('fs');

var controllers = "./controllers";
var files = fs.readdirSync(controllers);

for (var file of files) {
let controller = require(controllers + "/" + file);
if (controller.get) {
for (var get of controller.get) {
router.get(get.url, get.fun);
}
}
}

app.use(router.routes());

通过这段代码,我们就能把controllers文件夹中所有路径以及处理的函数加载进来,要添加一个新的页面,只需要在controllers中新建一个js文件,并把对应的url和处理函数暴露出来即可。

Koa内置对象

说道Koa的内置对象,其实我们在前面就已经见到了几个,比如说中间件里的this 实际上就是context对象。

context对象代表一次HTTP请求和回应,通过它我们能获取请求数据,选择如何回应。

它主要有这么几个内容

1
2
3
4
5
6
7
8
ctx.request   //请求对象
ctx.response //响应对象
ctx.cookie //cookie对象
ctx.session //session对象(需要koa-session中间件)
ctx.app //app对象
ctx.state //用于在中间件中共享数据的对象

//在中间件中写 this.request,this.response...

其中重点是request和response对象,因此主要也就介绍这么两个对象。

先是request

1
2
3
4
5
6
7
8
9
10
11
12
13
//示例:  http://localhost:3000/hello?name=Gogo&id=1
req.header //请求头 太长了省略后面
// { host: 'localhost:3000', connection:...}
req.href //完整路径 http://localhost:3000/hello?name=Gogo&id=1
req.method //请求方法 GET
req.url //请求的url /hello?name=Gogo&id=1
req.path //请求的路径 /hello
req.querystring //查询字符串 name=Gogo&id=1
req.search //查询字符串 ?name=Gogo&id=1
req.host //主机名 localhost:3000
req.query //解析查询字符串 { name: 'Gogo', id: '1' }
req.protocol //请求的协议 http
req.ip //对方的ip ::1 发给自己电脑

通过request就能详细知道对方到底想干啥。其中最有用的应该是req.query

然后来看response,常用的没几个

1
2
3
res.status   //http状态码
res.body //返回的内容
res.redirect(url) //重定向到url

常用的Koa对象就到这里了,一般来说能满足大部分需求了。
可以参考Koa文档

Nunjucks渲染模板

在开发中渲染一个字符串是一个很常见的需求。
比如有个这样的对象:

1
2
3
4
5
6
var data = {
name: '小明',
chinese: 78,
math: 87,
ranking: 999
};

我们需要把它渲染成

1
小明同学一年级期末考试语文78分,数学87分,位于年级第999名。

最古老的方法:

1
2
data.name + "同学一年级期末考试语文" + data.chinese + "分,数学" 
+ data.math + "分,位于年级第" + data.ranking + "名。"

Gogo感觉这么写挺反人类的。所幸的是ES6中JavaScript有了模板字符串的功能。

于是可以写成这样:

1
`${data.name}同学一年级期末考试语文${data.chinese}分,数学${data.math}分,位于年级第${data.ranking}名。`

对这个语法不熟悉的看这 ECMAScript 6 入门 模板字符串

但是这样拼接字符仍然无法满足web开发的需求,在web开发中,通常都是一个很长的html文件需要渲染输出,并且可能还需要判断、循环输出,因此拼接字符串并不是一个好的方法。Nunjucks就是解决这一问题的。

由于Nunjucks的官网提供了很详细的中文文档,因此Gogo在这里偷下懒,乃们自己看官网去吧。

Nunjucks 官方文档
廖雪峰JavaScript教程 使用Nunjucks